Showing posts with label Rcu. Show all posts

Saturday, July 12, 2014

RCU for BIAPPS and ODI


BI APPS 11.8 Installation[CREATING RCU for ODI and BIAPP]part -3

In this Part 3 of Bi Apps Installation we will  have the Practice of Installing the RCU for BI APPS and ODI
for Running the Rcu we need to download the  software and unzip in the database server temp folder 
 
CREATING RCU FOR BIAPPS

Step 1
Navigate to the /home/oracle/rcu/bin-- rcu is the staging directory where we unzip the V44918-01.zip 
run ./rcu to invoke the installer 


Step 2
Click create Button to create the RCU for BIAPPS

Step 3
Provide the data warehouse database details 
Host name      :=data warehouse database host name
Port               :=  Database Port
ServiceName  :=Data warehouse database service Name
Username       :=SYS
Password       :=Password of SYS user


Once the Prerequisite check completes fine then click ok and proceed to next step

Step 3
Create the Prefix as BIAPPS
and select the Oracle Business Analytic Warehouse-- it will create only the BI apps repository and we will create the ODI repository later

Step 4 

Provide the password for the BIAPPS schema user

Step 5
we need to provide the dump file location .. there are three dump file available and two of  ODI and one for BIAPPS

[oracle@biapp schema]$ pwd
/home/oracle/rcu/rcu/integration/biapps/schema
[oracle@biapp schema]$ ls
-rwxrwxr-x. 1 oracle oinstall 379461632 Apr 18 18:43 obia_comp.dmp
-rwxrwxr-x. 1 oracle oinstall 125952000 Apr 18 18:43 obia.dmp
-rwxrwxr-x. 1 oracle oinstall 857681920 Apr 18 18:42 obia_odi.dmp
-rwxrwxr-x. 1 oracle oinstall                70 Apr18 18:43 dmplabel.txt
[oracle@biapp schema]$
if you are installing the BI rcu from the different server then we need to keep this three files in the DW database server tmp directory and we need to mention the location in the value column


Step 6

Check the table space the will be create for the new schema

Increase the size of the  table space according to the requirement
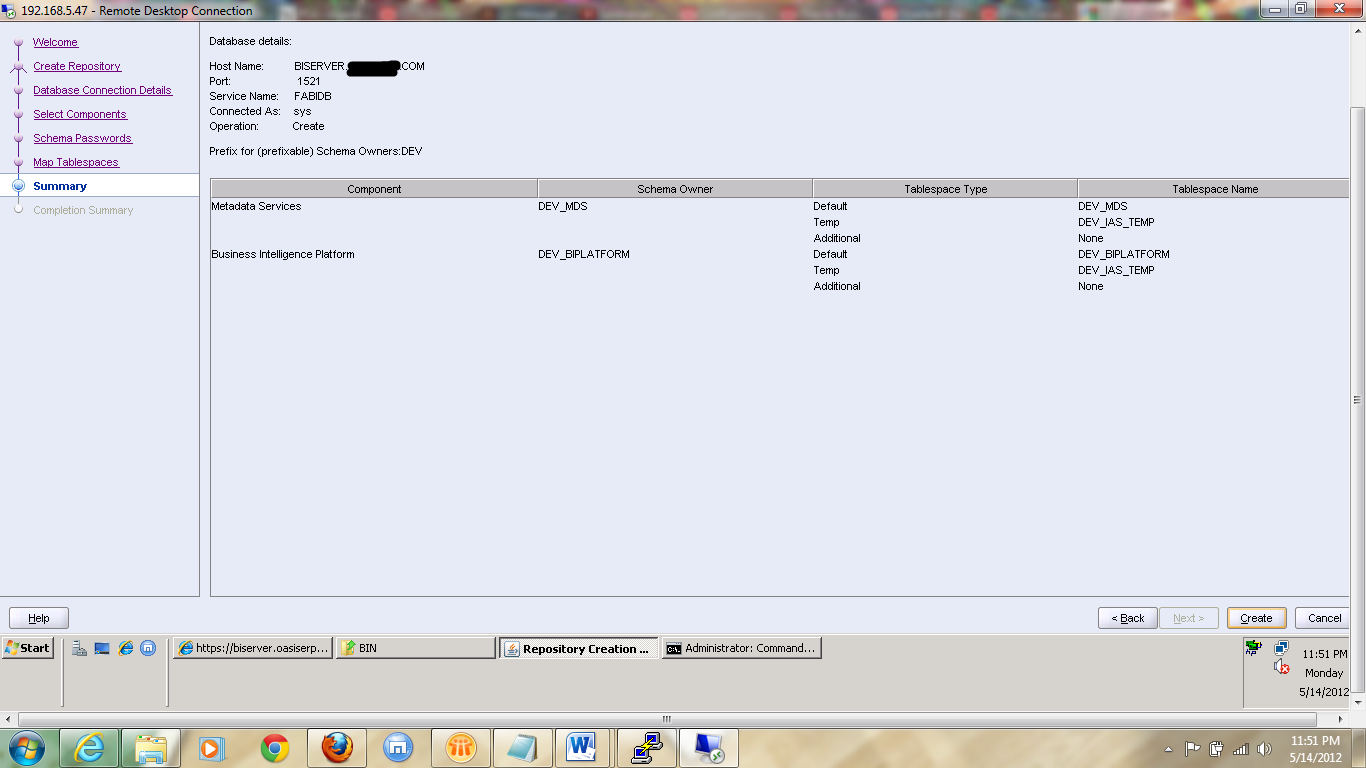


Step 7
Check the summary and proceed with the installation of RCU

Step 8
Check the summary and click finish for complete the RCU

CREATING RCU FOR ODI

Step 1

Run the ./rcu from the /home/oracle/rcu/bin  /home/oracle/ruc is the staging directory where the ruc software had been unzipped 

Step 2
Click create to create the new RCU


Step 3
Host name    Data Warehouse  database host name
Port              Database port
Service         Database Port
User Name  SYS
Password    OMsys123
check ok after the prerequisite check's had been completed successfully

Step 4
Create the prefix for the ODI Scheme's
select the components show in screen  to create the ODI schema

Step 5
[oracle@biapp schema]$ pwd
/home/oracle/rcu/rcu/integration/biapps/schema
[oracle@biapp schema]$ ls
-rwxrwxr-x. 1 oracle oinstall 379461632 Apr 18 18:43 obia_comp.dmp
-rwxrwxr-x. 1 oracle oinstall 125952000 Apr 18 18:43 obia.dmp
-rwxrwxr-x. 1 oracle oinstall 857681920 Apr 18 18:42 obia_odi.dmp
-rwxrwxr-x. 1 oracle oinstall                70 Apr18 18:43 dmplabel.txt
[oracle@biapp schema]$
provide the path in the value

Step 6


Step 7
Check the summary 


Sunday, June 29, 2014

Creating RCU for ADF Development

Creating the Rcu for ADF development 

Once the ADF Development  had  been installed then we can start the RCU  for the database
before start configuration of the domain .. The RCU will create the seeded schema which will be used for the different services of the middleware
We had used 12c database with the Oracle Linux six for this Practice 

Step 1
Navigate to the middle ware home and from the oracle_common and bin and start the rcu


Step 2
Click next to proceed to the next page

Step 3
There are three options which gives more flexibility for a person to run
[1]system load and product load   only run by the user who has the dba privileges
[2]Prepare Scripts for System Load -- it will create the script which contains all the schema  we need to provide the script to the person who has the sysdba privileges and execute the script
once the system load is done by the dba then the non dba can run the product load  
in this practice we are selecting the system Load and Product load

Step 4
Provide the database credentials for
Legends
Host name :Host name of the database Server
Port           :Database Port Number
Service Name: Database Service name
User name   : SYS
Password    :SYS password for the database [while creating the database for the adf create the orapw<instance_name> password for the sys] to connect remotely 
Role             :SYSDBA


Once  the database details are provide the prerequisite check start it process and all the prerequisite check is successful click ok to proceed 

Step 5
Select the necessary components which is need to be installed 

Step 6
Provide the password for sachems which is newly created 

Step 7


Step 8
Click the Create Button to Create the Schema for the Database


Tuesday, October 30, 2012

Oracle BI 11g Repository Creation Utility [Rcu]

OBI 11g Repository Creation Utility[BI RCU]

After installing the database we need to create the RCU for the BI here are the steps to Create the RCU

Step 1

Start the Rcu from the location where the rcu.zip is unziped


Step2

Select the create for creating the New RCU


Step 3

provide the necessary Database details


Hostname        : server name
Port                 :database port
Service name   :database service name
Username         :SYS or the other user who has the sysdba privilege


Once the pre-requisites check are completed then give OK and proceed with next

Step 4


Select the Business Intelligence component and then it will automatically select the metadata services


Once the RCU prerequisites  are completed successfully then click ok to proceed

Step 5 

we need specify the password for all the schema's


Step 6

Map the table space to the schema's if the table space's are not available it will be created


Step 7

click create the RCU


Step 8


Friday, October 12, 2012

RCU-6130:Action failed – RCU-6135 Error while trying to execute java action

RCU-6130:Action failed – RCU-6135 Error while trying to execute java action

This error is caused because some of the expected components installed with the fusion applications database are not installed

Step1

while installing the database we need to check the mandatory options as below in the screen

[1]Oracle Partitioning [2] OLAP [3]Lable Security[4]Data Mining[5]Real Time Applications Testing 


Step2

Install the required patches in the database from the installers

find the patch list in the location /path_of_staged_rup3/rup3/installers/database/11202patch
This patches may change according to the oracle's advice please refer the latest release note's for the fusion applications before installing the patches
Oracle Fusion Applications Release Notes, 11g Release 1, Update 3 (11.1.4) [ID 1455116.1]
[oracle@fahdb 11202patch]$ ls

10077191  10220058  10238786  10269193  10419629  11742094  11883804  12544032  12686274  13004894  13365700  13476197  8223165  9700115  9885553 10142788  10232083  10259620  10325230  11689869  11786272  12329775  12579349  12737666  13356617  13420723  13576540  9401552  9729764

Step 3

Check the components


SQL> select * from v$option where parameter in (
2 'Data Mining','Java','OLAP','Oracle Label Security','Spatial');PARAMETER VALUE
-------------------------------------------------- ------------------------------
Spatial                                          TRUE
Java                                              TRUE
Oracle Label Security                     TRUE
OLAP                                            TRUE
Data Mining                                   TRUE 

SQL> SELECT comp_name, status, substr(version,1,10) as version FROM dba_registry WHERE comp_id = 'CONTEXT';

COMP_NAME                      STATUS                         VERSION
------------------------------ ------------------------------ ------------------------------
Oracle Text                    VALID                          11.2.0.3.0


SQL> select * from ctxsys.ctx_version;

VER_DICT                                 VER_CODE
---------------------------------------- ----------------------------------------
11.2.0.3.0                               11.2.0.3.0

Now rerun The RCU...

If you had missed up nay post patching steps of the CTX Package then you may get this error also to rectify this error we need to follow all the steps the post install patch for all the patches which has it


when you have completed all the patching and the post patching steps then proceed to install the rcu .. RCU has the automatic cleaning of the Previous session so when this kind of error occurs cancel the RCU and rectify the cause and then rerun the RCU


Check the post regarding the steps to create the RCU

Monday, October 1, 2012

Creating OAM11g database RCU


Creating OAM 11g database RCU 


we need to create the  Rcu for OAM 11g with the fusion applications  for executing the rcu we need to create the separate database with all necessary init parameters
For the fusion applications there are two database rcu's want  be created  from the IDM side one is for the OID oracle internet directory and another one is for the OAM [oracle access manager]

Step1

GO the the installers/fmw_rcu/linux/bin and start the rcu by  ./rcu


Step2

click next to proceed to the next step


Step3

Select  Create to create the Rcu


Step4

provide the necessary values for the database connection


Host-name           :fully qualified host-name
Port                      :database prot number
Service Name       :database service name
User Name           :database username [sys]
password              :password of the sys user
Role                      :sysdba

Step5

Click Ok  after completing the success full test of prerequisites


Step6

Select the necessary components for installation of the OAM repository

Components to be selected for installing the OAM RCU with the fusion applications
1]AS common Schema
2]Metadata Services
3]Audit Services
4] In identity management cluster select all expect the ODS .. ODS is used for the oracle directory services will be installed in the separate database which will support the OID 
5]SOA and BPM infrastructure
6]SOA Infrastructure
7]User Messaging Services


Step7

It will check the prerequisites for installing the necessary components


Step8

Provide the necessary password for all the OAM schema's


Step9

Click ok to create the necessary Tablespace


Step10

Click Ok


Step11

Select create to create the rcu in the database


Step12

Click Close once the RCU is completed sucessfully