Showing posts with label Weblogic12c. Show all posts

Wednesday, September 11, 2019

INSTALLING WEBLOGIC 10.3.6 SERVER 

In this post, we are going to look into how to install WebLogic Server in Redhat or Oracle Linux 


[ i ] Start the WebLogic Installer. If you are using 64 bit, download the generic installer and use the -d64 as the option to install in 64-bit format. The command will be like below:

Syntax:  $JAVA_HOME/bin/java -d64 -Xmx1024m -jar <Weblogic Installer>

[oracle@oracleapp1 Downloads]$ $JAVA_HOME/bin/java -d64    -Xmx1024m   -jar wls1036_generic.jar
Extracting 0%....................................................................................................100%


[ii] Choose the middle-ware home where the WebLogic binaries will be installed


[iii] Choose the custom install to choose the components which will be installed with the WebLogic


[iv] Choose the components by selecting the checkboxes[this component can be chosen according to the business requirements ]


[v] Choose the correct JDK or Jrocket according to the WebLogic version.

[vi] Choose the location to install the WebLogic server binaries and coherence server binaries


[vii] Summary


[viii] once the installation is completed click done , next step is to create a domain in WebLogic server 


Saturday, December 22, 2018


Adding a New Application Tier Node to Oracle E-Business Suite R12.2

In Oracle E-Business Suite (EBS) environments, scaling out or implementing high availability often requires adding an additional application tier node. In this guide, we walk through the steps to add a new node to an existing EBS R12.2 instance, leveraging Rapid Clone and Dual File System architecture.

 Prerequisites

Before adding the node:

  • Ensure shared storage (for DB & apps) is accessible on the new host.

  • Ensure correct user (applprod) and environment setup exists.

  • Both RUN and PATCH file systems must be healthy on the primary node (omapps01).

  • Ensure WebLogic Admin Server is up and accessible.

Step 1: Run the add_filter_rule.sh Script

The add_filter_rule.sh script sets up required filter rules in the WebLogic layer before adding a node. You'll be prompted to enter the WebLogic Admin password.

applprod @ omapps01.domainname.com/home/applprod >sh add_filter_rule.sh

For details please refer log file /home/applprod/RegisterNodePreReq.log

Enter the WebLogic Server Admin Password:

add-filter-rule option executed successfully.

Step 2: Start the Admin Server on Patch File System

Before running Rapid Clone, ensure that the WebLogic Admin Server is up on the PATCH file system
This command ensures all necessary services are running and accessible from the new node for registration and cloning purposes.
applprod @ omapps01.domainname.com/omu01/app/oracle/fs1/inst/apps/OMPROD_omapps01/admin/scripts >./adadminsrvctl.sh start forcepatchfs

You are running adadminsrvctl.sh version 120.10.12020000.11

Enter the WebLogic Admin password:
Enter the APPS Schema password:
Starting WLS Admin Server...

Step 3: Run adnode.sh to Add the New Node

During execution, you’ll be prompted for:

  • APPS password

  • WebLogic AdminServer password

This initiates the Rapid Clone add-node process.  The script does the following:

  • Validates context files

  • Verifies AdminServer on RUN and PATCH FS

  • Generates new APPL_TOP context files

  • Adds node configuration for both RUN and PATCH file systems


applprod @ omapps02.domainname.com/omu01/app/oracle/fs2/EBSapps/comn/clone/bin >sh adnode.sh

                     Copyright (c) 2011, 2015 Oracle Corporation
                        Redwood Shores, California, USA

                        Oracle E-Business Suite Rapid Clone

                                 Version 12.2

                      adclonectx Version 120.30.12020000.22


Enter the APPS passwd :

Enter the Weblogic AdminServer password :

 Executing command: /omu01/app/oracle/fs2/EBSapps/comn/clone/bin/../jre/bin/java -Xmx600M -Doracle.jdbc.autoCommitSpecCompliant=false -classpath /omu01/app/oracle/fs2/EBSapps/comn/clone/bin/../jlib/ojdbc6.jar:/omu01/app/oracle/fs2/EBSapps/comn/clone/bin/../jlib/xmlparserv2.jar:/omu01/app/oracle/fs2/EBSapps/comn/clone/bin/../jlib/java::/omu01/app/oracle/fs2/FMW_Home/wlserver_10.3/server/lib/weblogic.jar:/omu01/app/oracle/fs2/EBSapps/comn/clone/bin/../jlib/wlfullclient.jar:/omu01/app/oracle/fs2/EBSapps/comn/clone/bin/../jlib/wlclient.jar:/omu01/app/oracle/fs2/EBSapps/comn/clone/bin/../jlib/wljmxclient.jar:/omu01/app/oracle/fs2/EBSapps/comn/clone/bin/../jlib/ojmisc.jar:/omu01/app/oracle/fs2/EBSapps/comn/clone/bin/../jlib/obfuscatepassword.jar:/omu01/app/oracle/fs2/EBSapps/comn/clone/bin/../jlib/emCfg.jar oracle.apps.ad.clone.RCloneSFSAddNode -contextfile /omu01/app/oracle/fs2/inst/apps/OMPROD_omapps01/appl/admin/OMPROD_omapps01.xml -configfile /omu01/app/oracle/pairsfiles/run/OMPROD_omapps02.txt -machinelistenaddress omapps02.domainname.com -logdir /omu01/app/oracle/fs2/EBSapps/comn/clone/bin/../FMW/logs/sfslog -promptmsg hide
Verifying: Apps schema password
Verifying:
        pairsfile /omu01/app/oracle/pairsfiles/run/OMPROD_omapps02.txt
        Run file system AdminServer is running
        Patch file system AdminServer is running
        Run file system domain
        Patch file system domain
Executing: run clone context...

Log file located at /omu01/app/oracle/fs2/EBSapps/comn/clone/bin/../FMW/logs/sfslog/run/RCloneSFSAddNode_12122204.log

Target System Base Directory set to /omu01/app/oracle

Target System Current File System Base set to /omu01/app/oracle/fs2

Target System Other File System Base set to /omu01/app/oracle/fs1

Target System Fusion Middleware Home set to /omu01/app/oracle/fs2/FMW_Home
Target System Other File System Fusion Middleware Home set to /omu01/app/oracle/fs1/FMW_Home

Target System Web Oracle Home set to /omu01/app/oracle/fs2/FMW_Home/webtier
Target System Other File System Web Oracle Home set to /omu01/app/oracle/fs1/FMW_Home/webtier

Target System Appl TOP set to /omu01/app/oracle/fs2/EBSapps/appl
Target System Other File System Appl TOP set to /omu01/app/oracle/fs1/EBSapps/appl

Target System COMMON TOP set to /omu01/app/oracle/fs2/EBSapps/comn
Target System Other File System COMMON TOP set to /omu01/app/oracle/fs1/EBSapps/comn

Target System Current File System Instance Top set to /omu01/app/oracle/fs2/inst/apps/OMPROD_omapps02
Report file located at /omu01/app/oracle/fs2/inst/apps/OMPROD_omapps02/admin/out/portpool.lst
The new APPL_TOP context file has been created :
  /omu01/app/oracle/fs2/inst/apps/OMPROD_omapps02/appl/admin/OMPROD_omapps02.xml
contextfile=/omu01/app/oracle/fs2/inst/apps/OMPROD_omapps02/appl/admin/OMPROD_omapps02.xml
Configuring: run fs add node...

Executing: patch clone context...

Log file located at /omu01/app/oracle/fs2/EBSapps/comn/clone/bin/../FMW/logs/sfslog/patch/RCloneSFSAddNode_12122218.log

Target System Other File System Instance Top set to /omu01/app/oracle/fs1/inst/apps/OMPROD_omapps02
Report file located at /omu01/app/oracle/fs1/inst/apps/OMPROD_omapps02/admin/out/portpool.lst
The new APPL_TOP context file has been created :
  /omu01/app/oracle/fs1/inst/apps/OMPROD_omapps02/appl/admin/OMPROD_omapps02.xml
contextfile=/omu01/app/oracle/fs1/inst/apps/OMPROD_omapps02/appl/admin/OMPROD_omapps02.xml
Configuring: patch fs add node...
-- Add node operation completed --

Node omapps02.domainname.com has been added successfully

Final Confirmation

Once the operation completes:

  • The new application tier node is registered.

  • Required configuration files are generated.

  • Both file systems (RUN and PATCH) are ready for service startup.

Conclusion

Adding a new node to your EBS 12.2 environment is a straightforward process with the adnode.sh utility. This ensures seamless integration into the dual file system setup, preparing the node for future patching and online patching activities.

By following these steps:

  • You prepare WebLogic for a new node.

  • Register and clone the environment correctly.

  • Scale your application tier for performance or HA needs.


Saturday, July 12, 2014

Step by Step Installation Of OBIEE 11.1.1.7


BIAPPS 11.8  installation[installing OBIEE 11.1.1.7]

INSTALL AND CONFIGURE OBIEE [11.1.1.7.0] 

Bi apps installation Part 2 In the first part we had installed the data ware house database and ruc for the OBIEE in this second part we need install and  configure the OBIEE 11.1.1.7 

Step 1
Unzip the OBEE11g software's and create the staging directory for installation
   V37449-01_2of2.zip
   V37450-01_2of2.zip
   V37449-01_1of2.zip
   V37450-01_1of2.zip
   V37451-01.zip
once you unzip all the software Binaries it will create the  bishiphome[staging directory  of the bi binaries]
Start the Bi installer by using the runInstaller in the bishiphome

Step 2


Step 3
Choose the Enterprise Install  [install the binaries and configure the domain for BI]
If we choose the software Only install then we need to run the config.sh command after the software installation completes for configuring the weblogic Domain for BI
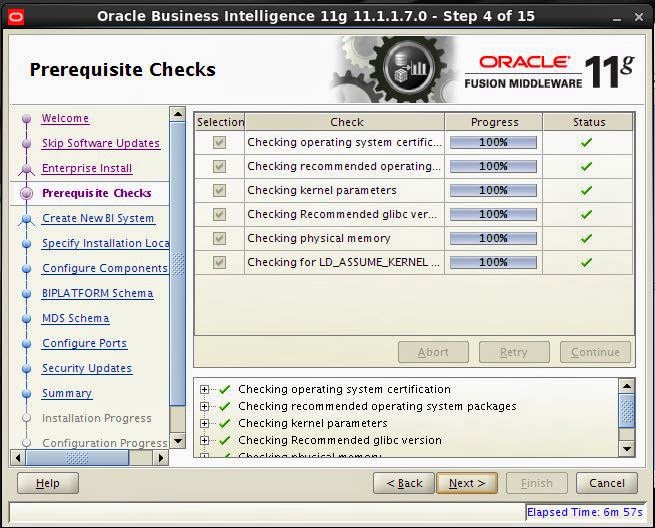
Step 4

Check all the Prerequisite check's  had been passed correctly if any of them fails then fix the particular issue and retry the failed prerequisite

Step 5
Provide the Weblogic  details for the New BI Domain
username     :weblogic_superuser
Password:   super user password for the weblogic
Domain       :Provide the Domain Name for the Bi [default bi foundation_domain]


Step 6
Provide the installation location and the directory structure for the different artifacts of the BI
Oracle Middle ware Home Location   :[The Location of the oracle middle ware home]
Oracle Home Directory                       Oracle_BI1[The Bi oracle Home directory  which will be inside the middle ware home] we need to Specify the directory name of the oracle home no need to specify the full path
Weblogic_server_Directory             :Middle ware_home/wlserver_10.3[oralce weblogic server binaries will be installed in this location]
Domain Home Location                  :Middle ware Home/user_projects/domain_name[The BI DOmain components will be installed in this location ]
Oracle Instance Location                 :Middle ware_home/instances[all the services which are c artifacts  [opmn controlled process rather in the weblogic are installed in this location] once you specify the instance name then all the binaries for the instance will be under the location mw_home/instances/<instance_name>
Instance_name                               :Name of the instance [this instance will be create under the mw_home/instances

Step 7
Select the Necessary components For the BI in the new edition Essbase suite had been introduced

Step 8
Provide the Details of the Data ware house database where the BI RCU had  been run
Connect String         :database_hostname:db:port:db_service_name
BIPlatform schemaa_Username :DEV_BIPLATFORM[when we are creating the rcu it will create user as prefix_BIPLATFORM[prefix is which we mentioned in the rcu creation stage for prefixing the user schema's]
BIPlatform_schema_password:   password for the DEV_BIPLATFORM schema

Step 9 
Provide the MDS[metadata service] schema details
Connect String  :db_hostname:dbport:dbservice_name
MDS_schema_Username  :DEV_MDS[prefix may change according to the prefix given during the ruc] we need to provide the schema name Ending with MDS
MDS_schema_password :Password for the MDS schema

Step 10
Specify the list of Port's which will be used by the BI ..
when you select the Auto port then it will install with the default Ports
when you want to used the custom ports for the bi components then create the file staticports.ini [sample staticports.init fill is located in
[orabi@biapp Response]$ pwd
/home/orabi/bishiphome/Disk1/stage/Response
[orabi@biapp Response]$ cat staticports.ini
# Note that if ports are not defined in this file they will be autoallocated starting at port 9500
# It is recommended that ports 9500-9520 are left unassigned for this auto-allocation
[WEBLOGIC]
#The Domain port no. This is the listen port of Weblogic Adminserver for the domain.
#Domain Port No = 7001
#The "content" port for the BIEE apps. This is the Weblogic Managed Server port on which BIEE applications are deployed.
#Oracle WLS BIEE Managed Server Port No = 9704
#The SSL port for the Weblogic Managed Server
#Oracle WLS BIEE Managed Server SSL Port No = 9804
#The Weblogic node manager port
#Node Manager Port No = 9556
[OPMN]
#Process Manager Local port no
#Oracle Process Manager Local Port No = 6700
#Process Manager Remote port no
#Oracle Process Manager Remote Port No = 6701
#Process Manager Request port no
#Oracle Process Manager Request Port No = 6702
[BIFOUNDATION]
#The listen port for OracleBIServer component
#Oracle BI Server Port No = 9703
#The monitor port for OracleBIServer component
#Oracle BI Server Monitor Port No = 9701
#The listen port for OracleBIPresentationServices component
#Oracle BI Presentation Services Port No = 9710
#The listen port for OracleBIScheduler component
#Oracle BI Scheduler Port No = 9705
#The monitor port for OracleBIScheduler component
#Oracle BI Scheduler Monitor Port No = 9708
#The script RPC port for OracleBIScheduler component
#Oracle BI Scheduler Script RPC Port No = 9707
#The listen port for OracleBIClusterController component
#Oracle BI ClusterController Port No = 9706
#The monitor port for OracleBIClusterController component
#Oracle BI ClusterController Monitor Port No = 9700
#The listen port for OracleBIJavaHost component
#Oracle BI JavaHost Port No = 9810
[ESSBASE]
#The listen port for Essbase Agent
#Essbase Agent Port No = 1423
#The listen port for Essbase Studio
#Essbase Studio Port No = 5300
You can Change the Ports in the file and Specify the custom ports but when you provide the custom ports provide a port series for each component[in default port allocation 9000 is used for BIfoundation Domain,opmn componets has 6000 serious port number's]  

Step 11
Metalink Support details
Step 12
check the summary before start the installation

Step 13
Start the installation Process

Step 14
After the installation Process Completed the configuration process will stat  and competes the configuration of all the components 

Step 15
Save the Configuration File nd click finish to finish the installaton

Check the weblogic console and opmn process once the instillation is completed all the process will be up and running

 [orabi@biapp bin]$ pwd
/u02/app/oracle/fmw/instances/instance1/bin
[orabi@biapp bin]$ ./opmnctl status -l
Processes in Instance: instance1
---------------------------------+--------------------+---------+----------+------------+----------+-----------+------
ias-component                    | process-type       |     pid | status   |        uid |  memused |    uptime | ports
---------------------------------+--------------------+---------+----------+------------+----------+-----------+------
essbasestudio1                   | EssbaseStudio      |   23772 | Alive    | 1960332751 |  6123440 |   6:38:46 | N/A
essbaseserver1                   | Essbase            |   23711 | Alive    | 1960332750 |  3690748 |   6:39:05 | N/A
coreapplication_obiccs1          | OracleBIClusterCo~ |   23430 | Alive    | 1960332745 |  1513436 |   6:39:30 | N/A
coreapplication_obisch1          | OracleBIScheduler~ |   23670 | Alive    | 1960332749 |  1951504 |   6:39:11 | N/A
coreapplication_obijh1           | OracleBIJavaHostC~ |   23630 | Alive    | 1960332748 |  4208388 |   6:39:15 | javahost:9810
coreapplication_obips1           | OracleBIPresentat~ |   23571 | Alive    | 1960332747 |  5336092 |   6:39:22 | N/A
coreapplication_obis1            | OracleBIServerCom~ |   23460 | Alive    | 1960332746 |  7783136 |   6:39:29 | N/A

Once the BI instillation Completes we Need to upgrade the weblogic 10.5 to 10.6 as we need to install the ODI .. In the same weblogic Domain
We need to Extend the web logic Domain for installing the ODI as ODI is compatible with the 10.6 version we need to upgrade to 10.6

UPGRADE WEBLOGIC 10.5 TO 10.6


Step 1
Stop all the service's running in the Domain .. opmnctl and weblogic managed and admin server
Download the Patch Patch 13529623: PLACEHOLDER BUG FOR WEBLOGIC SERVER 11GR1 (10.3.6) UPGRADE INSTALLER
and extract the patch to get get the wls installer which will upgrade the 10.5 to 10.6

Use the java from the BI home  and execute the jar installer

Step 2
click next to proceed to the next step

Step 3
Select the use existing middle ware home [this is the mw_home which is going to be upgraded]

Step 4
Metalink details

Step 5
Choose the product components which is need to be upgraded [in our env we need to upgrade all the products so  leave as the default one]

Step 6
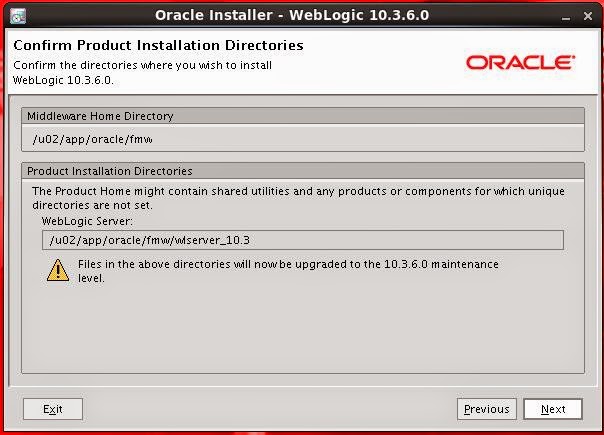
Make sure about the  wls_home which is going to be upgraded

Step 7
Click Done to finish the instalaltin 

Note:= check the part three for creating the RCU for ODI and BIAPPS 

Tuesday, July 1, 2014

Install and configure ADF Development In Weblogic 12c


Installing and Configuring ADF development in weblogic 12c 

In this practice we will go through the installing the ADF and configuring the Domain for the web logic
Step 1
Start the installer  as the java -jar fmw_infra_121200.jar to install the ADF development it will install the web logic ..or if the web logic is already installed you can extend it

Step 2
Provide the Oracle Middle ware Home Location for the Installation

Step 3
Select the Installation type if it is the dev instnace select the fusion Middle ware infrastructure with examples

Step 4
Once the Prerequisite check's had been completed successfully then proceed to the next step

Step5
Check the installation summary and save the response file

Step 6
Once all the installation Process had been completed successfully then Proceed to next step

Once the summary page click finish to finish the installation

After completing the installation now we need to proceed to creation of the RCU for the ADF development follow the steps in this post for creating the rcu  http://orafapp.blogspot.ae/2014/06/creating-rcu-for-adf-development.html
After RCU creation we need to configure the weblogic Domain

Configuring  Domain in weblogic 12c

We need to run the config.sh to start the weblogic Domain Configuration


Creating New Domain in weblogic 12c for the ADF Development

Step 1
Click the create New Domain to start creating the new Domain and Provide the location of the New Domain to be stored 
The default of the New Domain will be MW_HOME/user_projects/domains/<Domain_name>

Step 2
Select the Templates which is used for the Domain Creation .. for the ADF we need to Select Oracle Enterprise manager,which has dependency of Oracle JRF ,and weblogic Coherence , the Base server weblogic Domain will be the default Domain template

Step 3
Specify the location of the application location for the new Domain the path will be like
MW_HOME/user_projects/applications/<domain_name>

Step 4
Create the master username and password for the weblogi Domain .. this user will be acting as the super user for this Domain
Name:=<Name of the Super User>
Password:=<provide the Password for the user>

Step 5
Specify the Development or Prod Mode  for the Domain

Step 6
Click the RCU for fill the data from the RCU
DBMS/Service:=Database service where the RCU had been installed 
Hostname:=Database Sever Hostname
Port:=1521
Schema_name:=<DEV_STB> Scehma created during the Rcu
Password:=<schema password> the password specified during the rcu installation 

and click the get RCU Configuration for Username and Password 

Check the information for the installer screen after clicking the get RCU Configuration .. the test and bin is successfull proceed to next step 

Step 7
If we have the Rac database as the data source then we need to Select the tick box for the data source and then configure the data source for the RAC database .. if it is single installation database  proceed to the next page


Step 8
check all the connections after configuring with the data source 

Step 9
If you decide to  configure all  admin server and Node manager and Manged server and deployments and services then you can click all the four or you can click the admin server and Managed server's Node manager will be default configured and then deployments will be deployed according to the templates in the admin server 

Step 10
Server name:=Name of the Admin server for this Domain
Listen Address:=ALL Local address to including all the virtual address which had been specified 
Listen Port:=7001
Enable SSl:= if we have the ssl certificate and we need to login with the https then we can enable the ssl


Step 11
 Provide the Node manager username and password ..and select the Per Domain Node manager or we can configure the Node manager later after  finish the complete configuration

Step 12
Create the managed server with the necessary details 
Server Name:=Managed Server Name
Listen Address:=All Local Address 
Listen Port  :=<No of the Port where the managed server will be Listened >
Enable SSL:=tick the check box if you have the ssl certificate
SSL Listen Port:=SSL Port if SSL is enabled
Server Groups:=Select from two different server groups according to the application deployment

Step 13
Add the cluster with the cluster name [In  this cluster all the managed server will be placed] we can create multiple cluster for a domain

Step 14
Place the managed server's in the cluster  if we have multiple cluster's then place the managed server according to the Project design 

Step 15
Specify the Coherence cluster name and the listen Port If the Coherence is enabled 

Step 16
Name:=Physical Host name [or] Virtual Host name of the server
Enable Post Bind GID:=Click the tick box
Post Bind GID:=Nobody is the default value[we need to specify the Group id of the primary group which is associated with the weblogic o/s owner
Enable Post Bind Uid:=click the tick box to Enable the Post Bind UID
Post Bind UID:=Provide the User id which owner's the Web logic Binaries
Node Manager Listen Address:=Local Host
Node manager Listen Port :=5556[Default but we can give the port number according to availability]
We can create virtual ip's and virtual host name for deploying the admin server and  managed server [1]as the virtual host name are not associated with any of the physical hardware of network[Ethernet] the failure of ethernet card will not have huge effect on the virtual host names..
[2] In future we need to scale the Web logic  managed server in to another physical server it can be easily packed and unpack in the new server as the managed server are not associated with any of the physical server 

Step 17
Assign the servers to the machines as the better Practice if you have the less managed server then assign the manged server in the separate machines  IF there are multiple managed server then assign one cluster's managed server to one virtual host
In this env we have create the two managed server's and we have assigned to the two different virtual host names and admin server is assigned to the ADMINVHN virtual host name\

Step 18
We can select the library files and deploy accordingly to our necessity in this practice we have selected the auto deployment [if we tick all the four in the Step 9 then we need to deploy we have unchecked the deployment and the services in the step 9 so it will be automatically deployed as per the template and check the summary page

Step19
once the configuration process completes the 100 % then click the next page

Step 20
Click Finish to Finish up the installation